- About SNAP
- Getting Started
- SNAPtoolbelt
- SNAPcompiler
- RF Modules
- IoT Gateways
- SNAPconnect E12 Gateway
- SNAPconnect E12 Gateway (Legacy, Ubuntu 14.04 LTS)
- SNAPconnect E20 Gateway
- Full Example
- Scaling In Production
- Downloads
- Reference
- Legacy Products
Factory Restore
Restoring an SNAPconnect E20 to the factory default is accomplished using a microSD card image. Follow the steps below to restore your gateway.
Download image
Download the newest microSD card E20 installer image.
Write new image to a microSD card
Using Etcher (Windows, macOS, Linux):
Using Etcher, program the microSD card with the downloaded image.
Using dd (command line, Linux/macOS):
Use dd from the command line, where if is the sdcard image file and of is the device location of the
microSD card device. For example:
dd if=e20-VERSION-sdcard.img of=/dev/sdX bs=1M

sync
eject /dev/sdX
Warning
Ensure that the of variable points to the correct microSD card device location before executing this command.
Depending on your system, you may need to use sudo.
Insert microSD
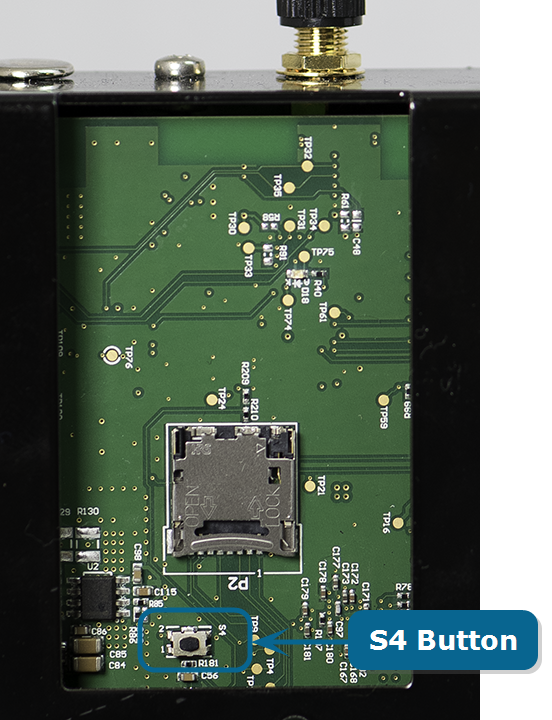
First, remove power to the SNAPconnect E20. Remove the access cover on the rear of the SNAPconnect E20, and insert the microSD card into the microSD card slot.
Slide the microSD card carrier toward the bottom of the unit (away from the antenna end) about a sixteenth of an inch (1.5 mm). Open the card carrier frame, which is hinged at the top (antenna end) edge. Insert your microSD card, contacts first, with the contacts exposed. Close the card carrier frame, and slide it toward the top of the unit to lock the card in place.
Use microSD to restore E20
Hold the button marked S4, apply power, and release the button.
LEDs 1, 2, and 3 will turn from amber to red when the restore process is in progress. This can take up to 5 minutes or more, depending on factors such as the speed of your microSD card.
The three LEDs will turn green, indicating that the process is complete. Disconnect power from the SNAPconnect E20, remove the microSD card, and reinstall the access cover.
Your SNAPconnect E20 is now restored and ready to use.